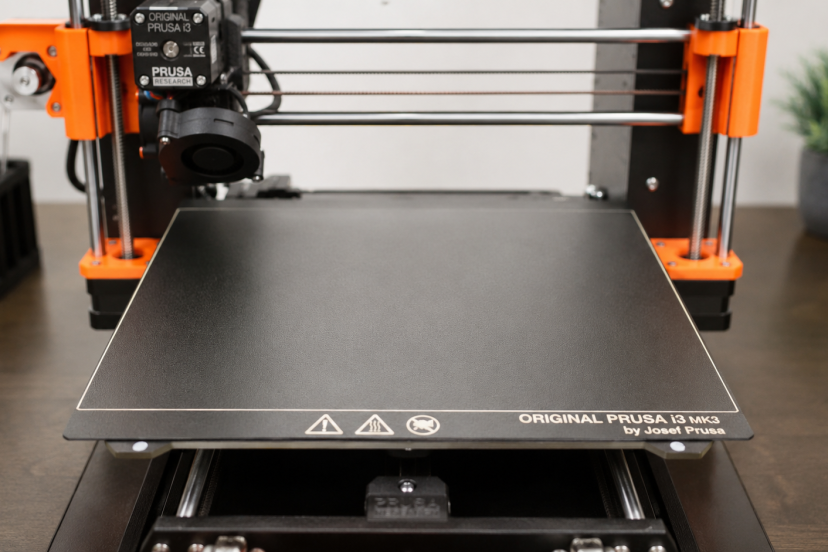
3D Printer Bed Leveling Tips for Better Results
Getting a clean first layer should not feel like luck. If your prints keep lifting, scraping, curling, or turning into spaghetti, the problem often starts with 3D printer bed leveling. Bed leveling helps the nozzle stay the right distance from the print surface, giving the filament enough grip without crushing it. In this guide, you’ll learn simple bed leveling tips, how to spot first-layer problems, how to adjust your Z offset, and how to get smoother, more reliable prints with less frustration.
Why a Level Bed Creates Better First Layers
A smooth print starts with a solid first layer. When that first layer sticks well, the rest of the print has a much better chance of turning out clean and stable.
In simple terms, 3D printer bed leveling means adjusting the print bed so the nozzle stays the right distance from the surface. That tiny gap matters more than most beginners realize.
If the nozzle sits too high, the filament may look loose, round, or stringy. It might not stick to the bed at all. If the nozzle sits too low, it can scrape the surface, block filament flow, or create thin, rough lines.
The goal is to get a gentle “squish.” The filament should press into the bed just enough to stick, but not so much that the nozzle drags through it.
Manual knobs and auto bed leveling sensors can both help. However, they work best when the printer itself is stable. A clean bed, tight gantry, flat build plate, and correct Z offset all play a role in getting that first layer right.
Signs Your Print Bed Is Not Level
Your printer usually gives you clues when the bed needs attention.
Common signs include:
- Filament not sticking in one corner
- Nozzle scraping the bed
- First-layer lines looking thin or transparent
- Filament bunching around the nozzle
- Prints lifting at the edges
- One side of the print looking perfect while the other side fails
If you see these issues often, pause and check your bed before changing random slicer settings. Many hobbyists waste hours adjusting temperature, speed, or retraction when the real problem sits right under the nozzle.
Start With a Clean Build Plate
Before you touch the leveling knobs, clean the build plate. A dirty surface can make a well-leveled bed act like a badly leveled one.
Finger oils, dust, glue buildup, and tiny plastic bits can all hurt adhesion. Use warm water and dish soap for removable plates when the manufacturer allows it. For quick maintenance, many makers use isopropyl alcohol on glass, PEI, or similar surfaces.
However, avoid harsh scraping if your surface has a coating. A scratched or damaged build plate can create uneven contact, especially near the center.
Clean first. Level second. Print third. That order saves headaches.
Heat the Bed Before Leveling
Your bed expands when it gets warm. That expansion may seem tiny, but 3D printers work with tiny gaps. A small change can affect first-layer quality.
For best results, heat the bed to your normal printing temperature before leveling. When printing PLA with a 60°C bed, warm the bed to that same temperature before leveling. If you print PETG hotter, level closer to that temperature.
Also heat the nozzle enough to remove any hardened plastic from the tip. A little blob of old filament can throw off your paper test and make the nozzle seem lower than it really is.
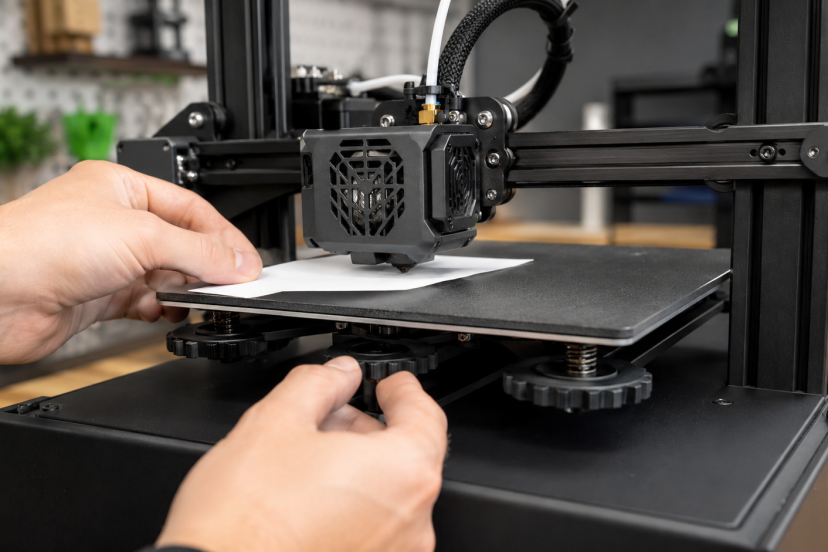
Use the Paper Method the Right Way
The paper method remains popular because it is simple, cheap, and surprisingly effective.
Here is the basic process:
- Home the printer.
- Disable the steppers if needed.
- Move the nozzle above one corner.
- Place a piece of paper under the nozzle, between the nozzle tip and the build plate.
- Turn the leveling knob until the paper moves with a light, even drag.
- Repeat on every corner.
- Check the center.
The key phrase is “slight resistance.” The paper should not slide freely like nothing touches it. It also should not feel pinned down. You want a gentle drag.
After each adjustment, go around the bed again. Changing one corner can affect another corner, especially on spring-mounted beds.
Check All Four Corners and the Center
Do not level only one corner and call it done. The nozzle needs consistent spacing across the whole print area.
Start with the corners, then check the center. If the corners feel right but the center feels too high or too low, your bed may have a slight warp. Many beginners run into this issue sooner than they think.
A glass plate, magnetic PEI sheet, or mesh bed leveling can help. However, do not panic over tiny differences. Your goal is not laboratory perfection. Your goal is a first layer that sticks evenly and looks consistent.
Adjust Your Z Offset Carefully
Z offset controls the final distance between the nozzle and the bed after homing or probing. This setting matters a lot, especially on printers with BLTouch, CR Touch, inductive probes, or strain-based sensors.
Prusa’s first-layer calibration guide explains that the goal is to adjust nozzle height until the plastic sticks well and looks slightly squished on the print surface.
Move slowly when adjusting Z offset. Tiny changes make a big difference. A shift of 0.05 mm can turn a messy first layer into a clean one.
If the lines look round and separate, lower the nozzle slightly. If they look transparent, rough, or scraped, raise the nozzle slightly.
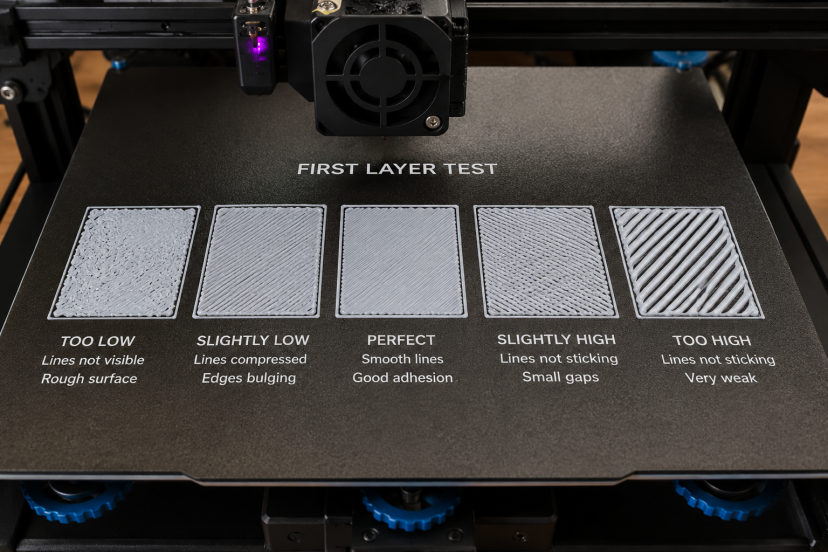
Run a First-Layer Test Print
A test print tells you more than a paper check alone. Paper gets you close. A first-layer test helps you fine-tune.
Use a simple pattern that prints squares or lines across the bed. Watch how the filament lays down.
A good first layer should look smooth and connected. The lines should touch each other without deep ridges. You should not see gaps between passes.
If one corner looks too thin, lower that corner slightly. If another corner looks smashed, raise it a touch. Make small adjustments and rerun the test.
This step feels boring at first. But once you see how much it improves your prints, you will treat it like a pre-flight check.
Manual vs Auto Bed Leveling
Manual leveling uses knobs, screws, springs, or silicone mounts to adjust the bed. It teaches you how your printer behaves, and every beginner should learn it.
Auto bed leveling uses a sensor to measure points across the bed. Then the printer creates a map of the surface. Marlin’s bilinear bed leveling documentation explains that automatic bilinear leveling probes fixed points and builds a mesh that represents imperfections across the bed.
However, auto leveling does not magically repair every problem. You still need a stable bed, square frame, clean nozzle, and correct Z offset.
Think of auto bed leveling as power steering. It helps a lot, but you still drive the car.
Bed Leveling Tips for Better First Layers
Tighten Loose Hardware
Before you keep adjusting the bed, check the printer itself. A wobbly frame, loose eccentric nut, or shaky bed carriage can ruin leveling.
Move the bed gently. If it rocks, fix that first. Check the gantry too. If one side sits lower than the other, your nozzle will not behave consistently.
Replace Weak Bed Springs
Stock bed springs on budget printers often feel soft. They can drift after several prints. Stronger springs or silicone bed mounts help the bed stay stable longer.
Silicone mounts do not bounce like springs, which makes them a favorite upgrade for many Ender-style printers.
Avoid Leveling With Filament on the Nozzle
Old filament stuck to the nozzle changes the gap. Heat the nozzle and wipe it carefully before leveling.
Use tweezers or a brass brush with caution. Never grab a hot nozzle with your fingers. That lesson arrives fast and spicy.
Slow Down the First Layer
Even with good leveling, your first layer needs patience. A slower first layer gives filament more time to stick.
Many makers print the first layer at 15 to 30 mm/s, depending on the printer and material. You can speed things up later, but let the first layer earn its rent.
Use the Right Bed Temperature
Bed temperature affects adhesion and warping. Research on fused filament fabrication has found that bed temperature can significantly influence warpage deformation, which connects directly to print stability and dimensional quality.
For PLA, many users start around 50°C to 60°C. PETG often needs more heat. ABS usually needs an enclosure and higher bed temperature.
Always match the temperature to the filament and build surface.
For more practical print ideas, check out these 3D printed kitchen gadgets that turn everyday printing into useful home projects.
Recommended Products for Bed Leveling
Here are five helpful products to consider when improving bed leveling and first-layer consistency.
1. Stainless Steel Feeler Gauge Set
A feeler gauge gives you a more consistent gap than paper. It works well if you want repeatable manual leveling.
2. Creality CR Touch Auto Bed Leveling Kit
The CR Touch works with many Creality printers and uses a probe to measure the bed surface.
3. BLTouch Auto Bed Leveling Sensor
BLTouch remains a popular upgrade for printers that support probe-based leveling.
4. Silicone Bed Leveling Mounts
Silicone mounts replace standard bed springs on many printers.
5. PEI Magnetic Build Plate
A PEI spring steel sheet gives many materials a reliable surface for adhesion.
Final Thoughts
Good 3D printer bed leveling gives every successful print a stronger start. When you clean the build plate, level the bed while it is heated, fine-tune the Z offset, and check the first layer before a full print, you reduce common problems like poor adhesion, nozzle scraping, warping, and failed prints. It may feel like a small setup step, but it has a big impact on print quality, especially for makers who want cleaner details and more reliable results. Take a few extra minutes to dial in the bed, and your printer will reward you with smoother first layers, fewer failures, and better finished parts.
FAQs
What is 3d printer bed leveling?
3d printer bed leveling means adjusting the print surface so the nozzle stays the right distance from the bed across the build area. This helps the first layer stick evenly.
How often should I level my 3D printer bed?
Level it whenever first-layer quality changes, after moving the printer, after changing the nozzle, or after removing and reinstalling the build plate. Some printers need it often. Others stay stable for many prints.
Is auto bed leveling better than manual leveling?
Auto bed leveling helps, but it does not replace good setup. You still need a stable frame, clean bed, correct Z offset, and proper probe settings.
Why does my filament not stick after leveling?
Your bed may be dirty, the nozzle may sit too high, the bed temperature may be wrong, or the first-layer speed may be too fast. Start by cleaning the plate and running a first-layer test.
What should a good first layer look like?
A good first layer looks smooth, slightly flattened, and connected. The lines should not look round and loose, but they also should not look scraped, transparent, or overly thin.