3D Printer Layer Height Settings for Better Prints
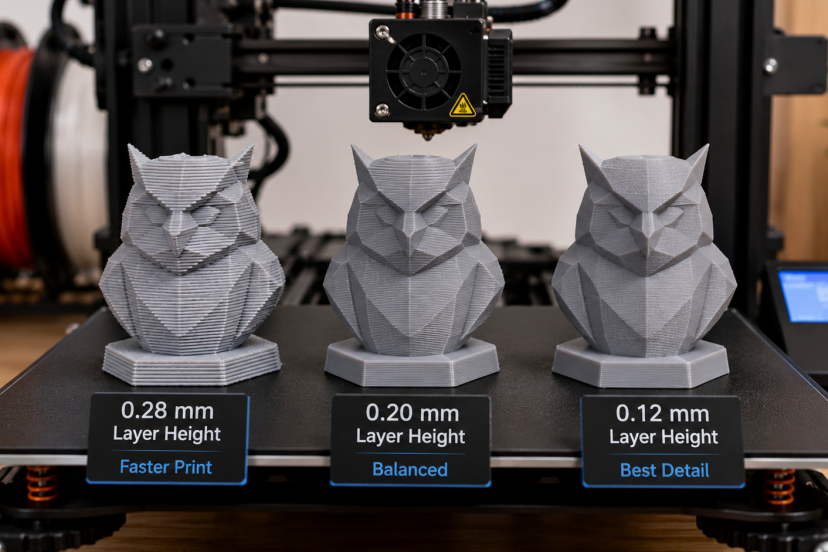
One small slicer setting can change how a print looks, how long it takes, and how cleanly its details appear. That setting is 3D printer layer height. Layer height controls each horizontal layer’s thickness. Smaller layers can produce smoother curves and finer vertical detail. Thicker layers finish faster, making them useful for prototypes and large parts. Match the setting to the model, nozzle, material, and purpose.
What Is 3D Printer Layer Height?
Layer height refers to the thickness of each individual layer your 3D printer lays down, usually measured in millimeters. At 0.20 mm, the printer builds the object in slices that are 0.20 mm tall.
Picture a staircase. Short steps follow a curved shape more closely, so the surface looks smoother. Tall steps cover distance faster, but the stair-step effect becomes easier to see on slopes and rounded areas.
Layer height mainly affects Z-axis detail. Nozzle size, cooling, motion, and orientation still shape the result.
The Best Starting Setting for Most Prints
For a standard 0.4 mm nozzle, start at 0.20 mm. It offers a useful balance of speed, quality, and reliability.
| Layer height | Best use |
| 0.08–0.12 mm | Miniatures, faces, and display models |
| 0.16 mm | Detailed parts with reasonable print times |
| 0.20 mm | Everyday prints and prototypes |
| 0.24–0.28 mm | Fast drafts, brackets, and organizers |
| 0.30–0.32 mm | Coarse prints near a 0.4 mm nozzle’s limit |
Treat these figures as starting points because printers and filaments behave differently.
How Layer Height Affects Quality and Print Time
Lower layers reduce visible stepping on domes, faces, and slanted walls. They can also preserve subtle height changes that may disappear when you use a coarser setting.
A peer-reviewed study on FDM-printed PLA found that layer height was one of the most influential factors affecting surface roughness. Under the study’s testing conditions, smaller layer heights generally produced smoother surfaces.
However, a lower setting cannot fix ringing, weak cooling, loose belts, damp filament, or inconsistent extrusion. A well-calibrated 0.20 mm print may look better than a poorly tuned 0.10 mm print.
Reducing the layer height from 0.20 mm to 0.10 mm can nearly double the total number of layers. Other slicer settings will affect the final estimate, so check the preview before turning a two-hour print into an overnight project.
Layer Height and Nozzle Diameter
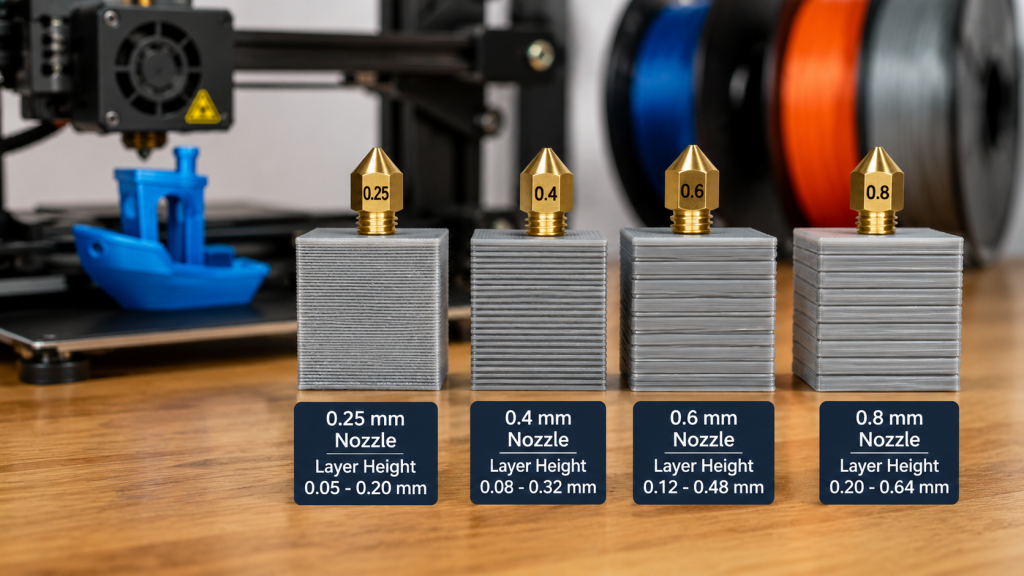
Nozzle diameter sets a practical ceiling for layer height. A common rule keeps the maximum near 70% to 80% of nozzle diameter. Prusa’s layer and perimeter guide lists about 0.32 mm as the maximum for a 0.4 mm nozzle. working ranges include:
- 0.25 mm nozzle: about 0.05–0.20 mm
- 0.4 mm nozzle: about 0.08–0.32 mm
- 0.6 mm nozzle: about 0.12–0.48 mm
- 0.8 mm nozzle: about 0.20–0.64 mm
A smaller nozzle improves tiny XY details and narrow features. A smaller layer height improves vertical and sloped surfaces. Our guide to 3D printer nozzle upgrades explains when changing the nozzle makes more sense than lowering the layer setting.
Does a Smaller Layer Height Make Prints Stronger?
Not automatically. Strength also depends on nozzle temperature, cooling, wall count, material, orientation, and extrusion quality.
For functional parts, orientation often matters more than moving from 0.20 mm to 0.12 mm. Position the model so the main load does not pull layers apart.
Add walls before using excessive infill, then confirm that the filament bonds properly at your chosen temperature and speed.
Match Layer Height to the Model
Use 0.10 or 0.12 mm for miniatures, figurines, lithophanes, and curved decorative pieces. Fine layers help most where people will notice smooth contours.
Use 0.16 or 0.20 mm for enclosures, toys, replacement parts, and household projects. They preserve detail without making the printer take a vow of slowness.
Use 0.24 to 0.32 mm for rough prototypes, workshop fixtures, large organizers, and parts you plan to sand or coat.
Choosing Layer Height for PLA
PLA handles a broad range of settings because it flows predictably and cools quickly. Still, inconsistent or damp filament can create rough walls that resemble a layer-height problem.
Start with the filament maker’s temperature range, then print a temperature tower. This comparison of PLA filament for home 3D printing covers dependable materials for calibration and everyday projects.
At fine settings, slow down if the printer overheats small details. At thicker settings, make sure the hot end can maintain steady flow.
First-Layer Height Is Different
The first layer has one main job: stick. It does not need to match the rest of the model.
Many profiles use a first layer near 0.20 mm, even when later layers print at 0.10 or 0.12 mm. The thicker first layer tolerates small bed variations.
Do not use layer height to hide poor leveling or a bad Z-offset. Clean the bed and adjust the first-layer squish until neighboring lines touch without becoming transparent or heavily ridged.
Use Variable Layer Height
Variable or adaptive layer height uses fine layers on curves and thicker layers on simple sections. It can improve visible detail without slowing the entire model.
This feature works well for helmets, vases, figurines, and rounded housings. Inspect the preview because abrupt changes may create subtle bands. Smooth transition zones manually when your slicer allows it.
A Simple Calibration Method
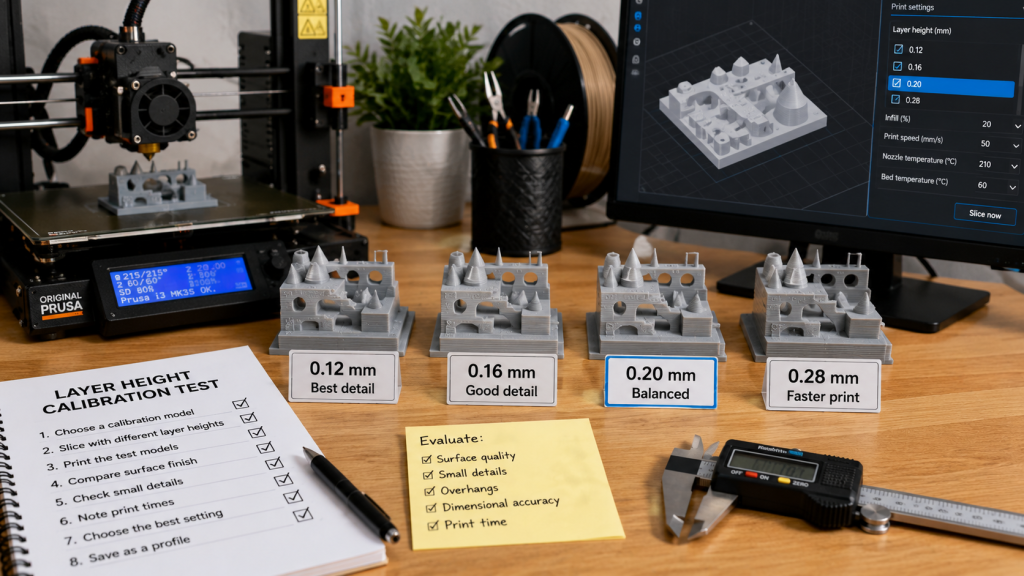
Choose a small test model with curves, slopes, holes, and text. Print it at 0.12, 0.16, 0.20, and 0.28 mm without changing other settings.
Compare surface finish, small features, overhangs, dimensional fit, and print time. Side lighting makes layer lines easier to see. Save the winner as a named slicer profile.
Repeat the test after changing the nozzle, material, or speed. One organized test beats weeks of random knob-twiddling.
Common Mistakes to Avoid
Do not choose 0.08 mm for every model simply because smaller sounds better. It often adds hours without improving flat or vertical surfaces.
Avoid exceeding the nozzle’s practical limit. The lines may become too rounded to press firmly into the previous layer, hurting consistency and bonding.
Finally, change one setting at a time. When you adjust height, speed, temperature, flow, and cooling together, you cannot tell which change helped.
Recommended Products
1. LUTER MK8 Brass Nozzle Assortment
A mixed nozzle set helps you compare detail-focused and speed-focused profiles. Check the thread type, length, and hot-end compatibility before ordering.
2. NEIKO 01407A Electronic Digital Caliper
This caliper helps measure filament, wall thickness, nozzle markings, and finished dimensions. It is useful for nearly every calibration project.
3. Polymaker PolyLite PLA
Consistent PLA removes one variable from layer-height testing. It suits calibration pieces, decorative models, and everyday prints.
4. SUNLU S2 Filament Dryer
Dry filament supports steadier extrusion and may reduce popping, rough texture, and random surface defects. Follow the material maker’s drying guidance.
5. 3D Printer Nozzle Cleaning Needle Kit
Cleaning needles and tweezers can clear partial clogs that cause uneven extrusion. Select needles that fit your nozzle and handle the hot end carefully.
Verify dimensions and printer compatibility before buying.
Conclusion
The best 3D printer layer height fits the job. If your printer uses a 0.4 mm nozzle, try a 0.20 mm layer height as your initial setting. Move down to 0.10–0.16 mm for visible detail, or move up to 0.24–0.32 mm when speed matters more than a silky surface. Respect the nozzle limit, inspect the slicer preview, and test instead of guessing. Once you save reliable detailed, standard, and fast profiles, layer height becomes one of the easiest ways to control print quality.
FAQs
Which Layer Height Works Best With a 0.4 mm Nozzle?
Use 0.20 mm for most prints, 0.10–0.16 mm for detail, and roughly 0.24–0.32 mm for faster printing.
Is 0.1 mm better than 0.2 mm?
It can make curves and small vertical details smoother, but it takes longer. Simple functional parts may show little improvement.
Can layer height exceed nozzle diameter?
Avoid it. Keep the maximum near 70% to 80% of nozzle diameter unless your hardware and tested profile support something different.
Does layer height affect supports?
Yes. Fine layers can improve sloped surfaces and support contact control, but they create more support layers. Tune interface distance with layer height.
Should the first layer match the rest?
No. A first layer near 0.20 mm often improves adhesion and tolerates small bed variations, even when later layers use finer settings.